Step 1: Login to your FreshLime account.
Navigate to https://app.freshlime.com/user/login/, enter your login information, and click Login.
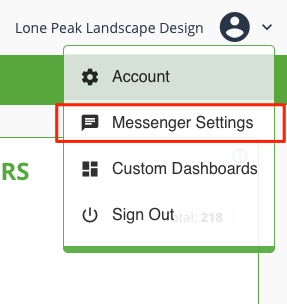
Step 2: Access the Messenger Settings page.
Find the user profile icon in the top right corner, and click on the down arrow. This will expand your account settings menu. Click on Messenger Settings.

Step 3: Customize your chat settings & branding.
Find the Chat Settings & Branding section. In this section, you will be able to adjust the agent name, theme color, and logo/icon being used in Messenger.
Step 1: Login to your FreshLime account.
Navigate to https://app.freshlime.com/user/login/, enter your login information, and click Login.
Step 2: Access the Messenger Settings page.
Find the user profile icon in the top right corner, and click on the down arrow. This will expand your account settings menu. Click on Messenger Settings.
Step 3: Customize your chat settings & branding.
Find the Chat Settings & Branding section. In this section, you will be able to adjust the agent name, theme color, and logo/icon being used in Messenger.

Step 4: Update your Messenger installation code.
Once you’ve finished adjusting the chat settings and have customized your webchat experience, you’ll just need to copy and paste the code snippet onto your site to activate it. If you have previously installed the code snippet onto your site, you will need to overwrite it with the updated code.
Click the Copy Webchat Code button and the code snippet will automatically be copied to your clipboard. You can paste that directly into your site or save it to a file to add to your site at a later date. For full instructions on how to install the code snippet onto your site, click here and see instructions under the Installing Messenger section.
Step 4: Update your Messenger installation code.
Once you’ve finished adjusting the chat settings and have customized your webchat experience, you’ll just need to copy and paste the code snippet onto your site to activate it. If you have previously installed the code snippet onto your site, you will need to overwrite it with the updated code.
Click the Copy Webchat Code button and the code snippet will automatically be copied to your clipboard. You can paste that directly into your site or save it to a file to add to your site at a later date. For full instructions on how to install the code snippet onto your site, click here.